EasyCatalog Tutorial - Getting started

As I think you already know, EasyCatalog is one of the best-known and most popular InDesign catalog plugins in the world. On this page, we will showcase some of the most important features of EasyCatalog and some useful configurations to create a layout like the one above.

You can download the project file for free by clicking on the blue button. It is under a creative common license, so feel free to experiment and use it for your commercial documents. Please remember to cite us in the attribution.

Feel free to contact us if you need further assistance, ideas, or support.

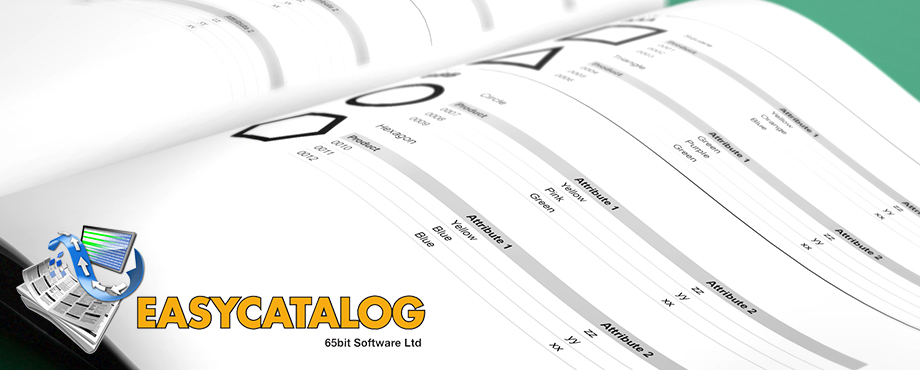
EasyCatalog is a suite of plugins for Adobe InDesign that extend InDesign’s standard features with functions focused on creating and managing data-intensive documents.
EasyCatalog’s most important additions to InDesign:


  • Extend the connection between documents and data sources. Multiformat, ordering, grouping, transformation.
  • Extend the styling beyond the objects to create “product styles” that can be enriched with Pagination Rules and stored as assets in InDesign Libraries.
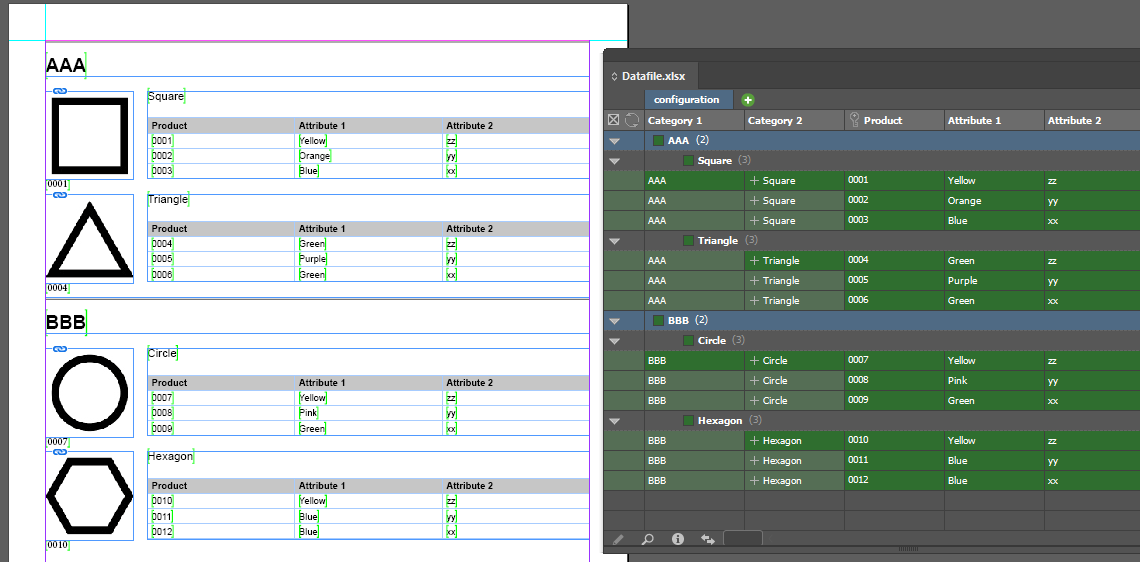
  • Recall product styles based on the data source value and automatically place the product styles in the document filled with relative information from the data source.
  • Preserve the linking between documents and data sources for updates.
  • EasyCatalog Functions can be used with the same JavaScript you use for other InDesign automation tasks.


On this page, we will showcase some of the most important features of EasyCatalog and some useful configurations.

Table of Contents

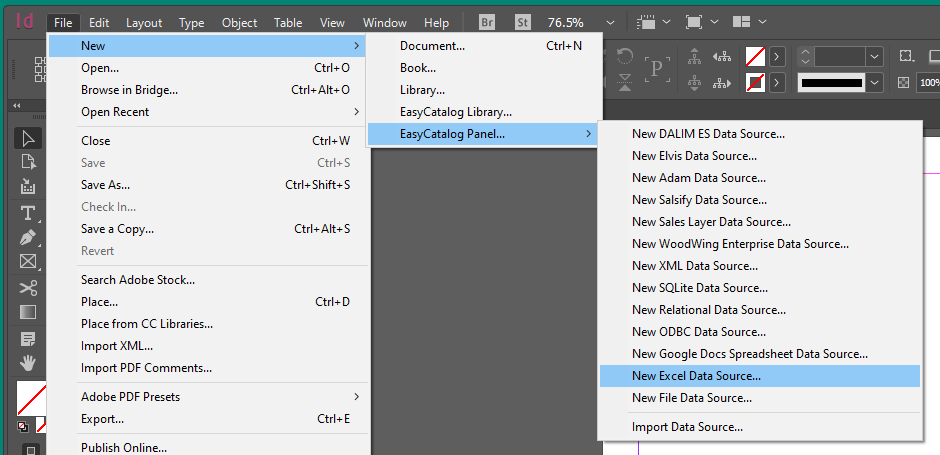
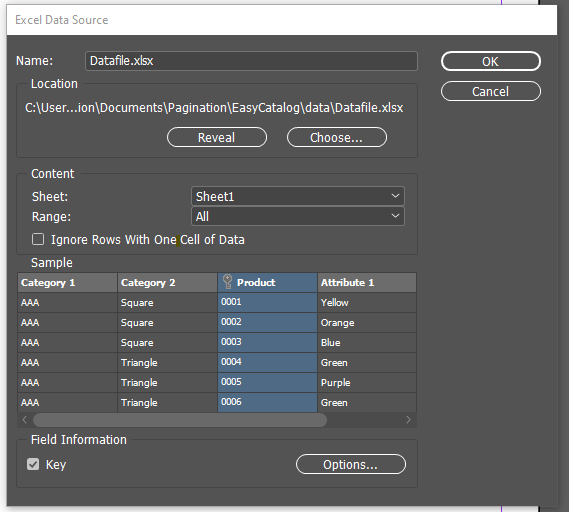
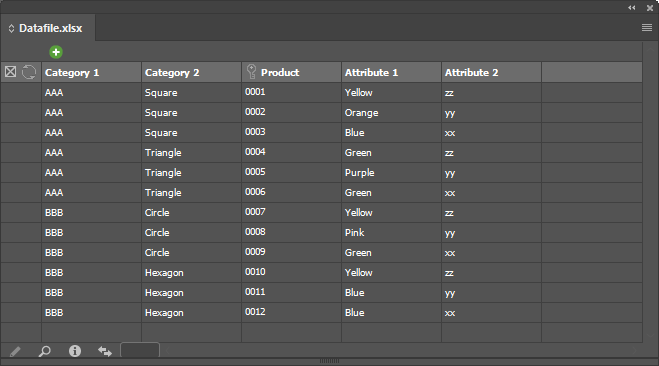
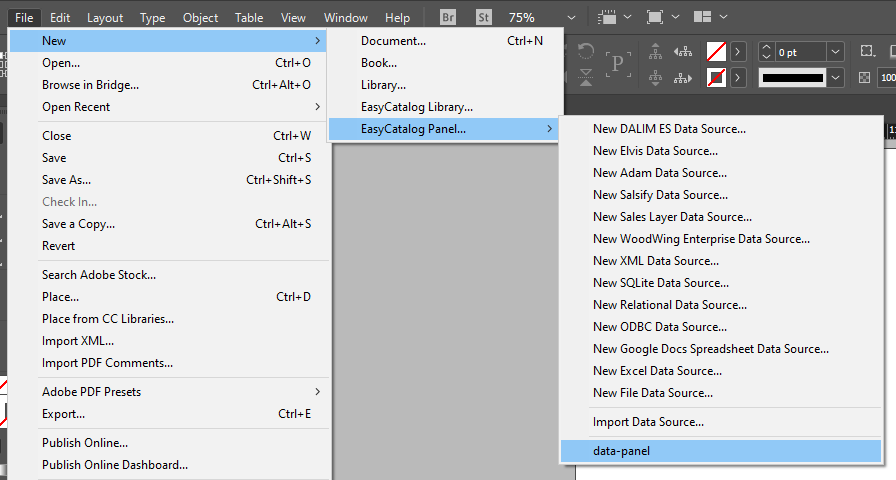
1. Creating a data panel
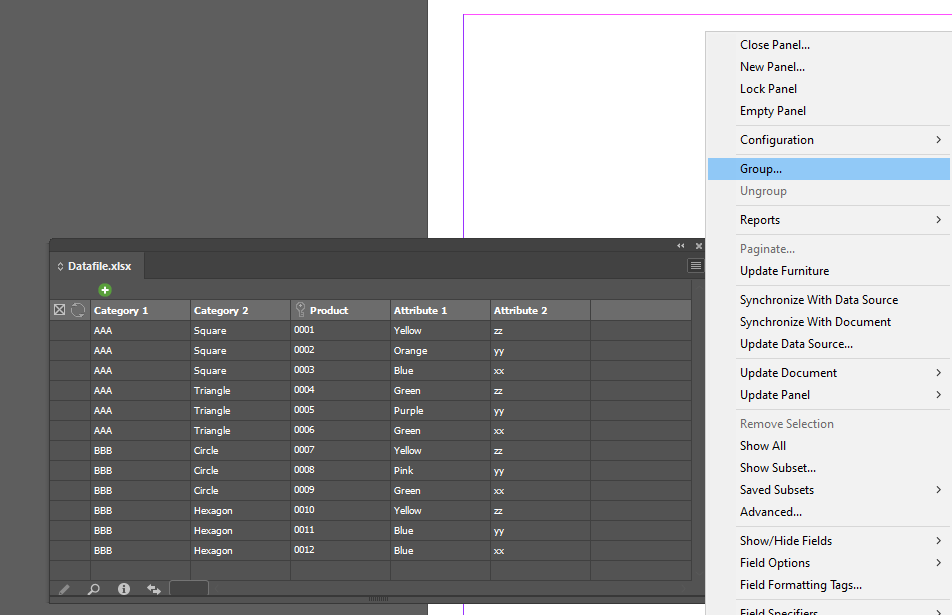
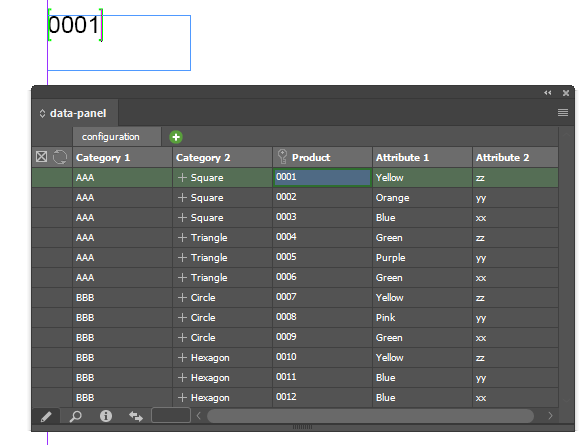
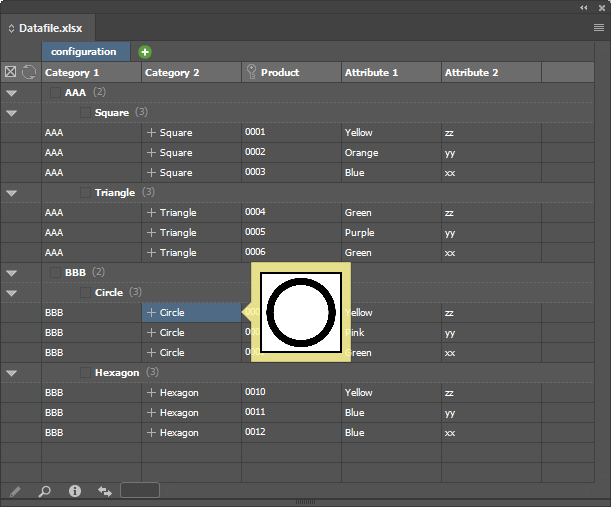
2. Grouping data
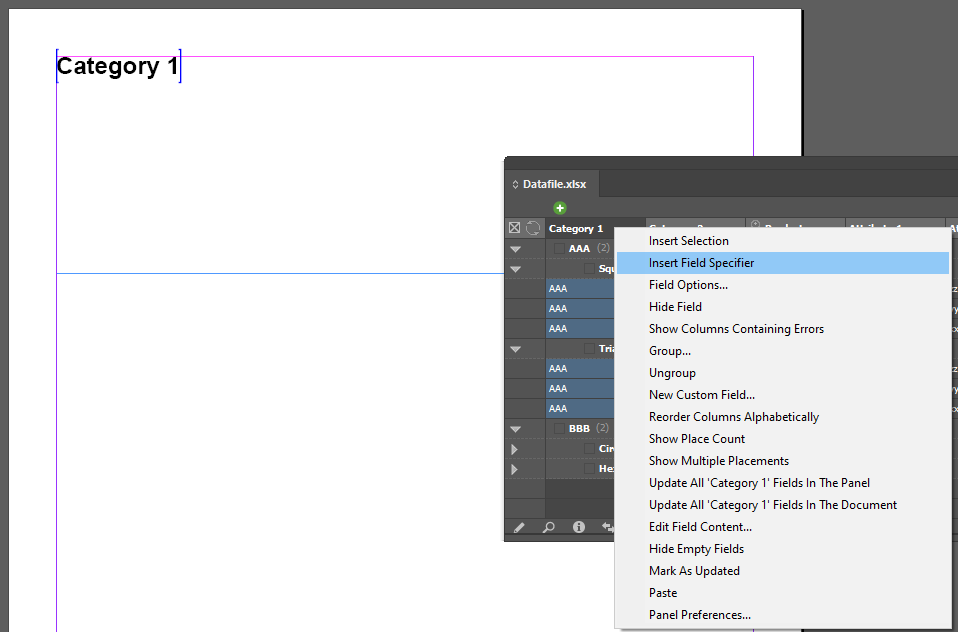
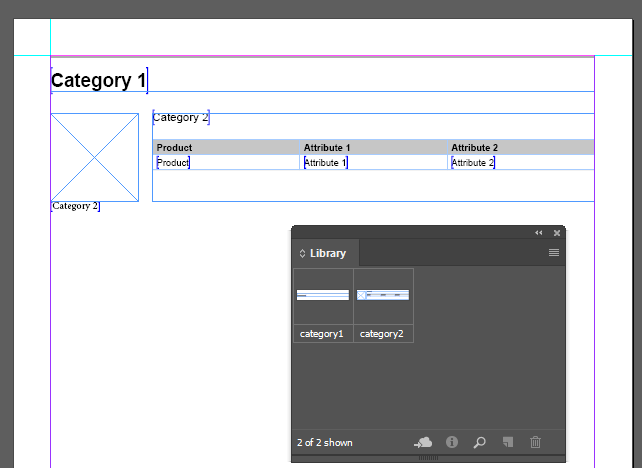
3. Inserting a field specifier in the document
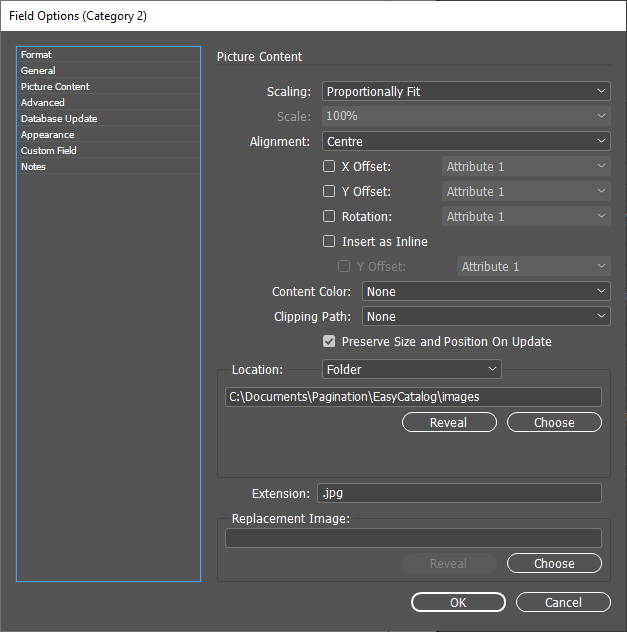
4. Creating a product style
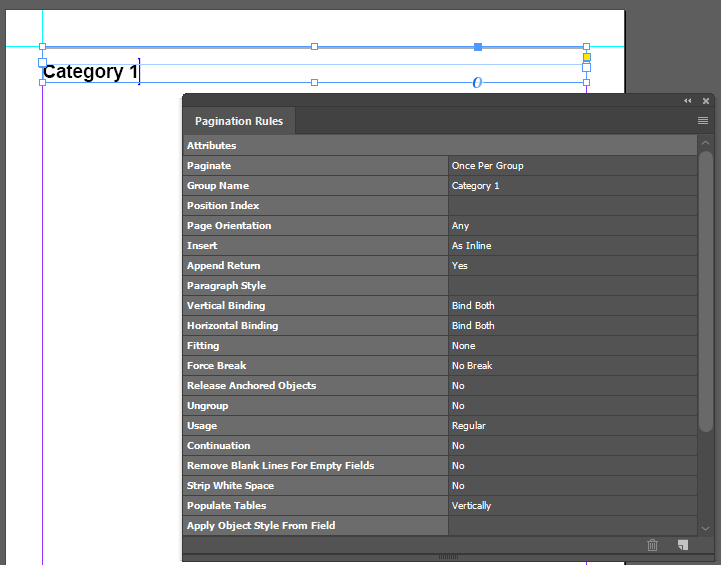
5. Paginating a document
6. Updating a document
7. Setting paths correctly

Creating a data panel

EasyCatalog’s installation is straightforward. Once installed, you can begin with the first step: creating a data panel in InDesign. In InDesign, the panels are usually located on the right side of the screen and contain all the tools necessary to work in your document. Thanks to EasyCatalog, you’ll be able to create a new type of panel containing your data source. It’s very simple. 

File > New > New EasyCatalog Panel

The setting dialog opens with preset preferences, and you click OK. 

easycatalog create panel

panel

Grouping data (optional)

This is an optional step, it depends if the logic of your document is flat or, as it happens in most publications, there is a hierarchy that groups products into different categories. 

Family A
• Product 1
• Product 2
• Product 3

Family B
• Product 4
• Product 5

This is the biggest game-changer in EasyCatalog when compared to standard free tools like InDesign Data Merge. Firstly because it helps you really keep your product in the data panel organized. And secondly, because the pagination rules that we are going to see later can be assigned to different levels of the hierarchy, letting you the very useful capabilities to assign different styles and behaviors to various levels of your data, and assign them sequentially during the pagination.

Sequentially means: first you can paginate category level information such as title, description, and pictures, and immediately after that, paginate the products information of the items belonging to the same category, as soon as the product in the first category finish, the pagination automatically goes on with the second category.

So, in order to use the grouping features from the EasyCatalog Data Panel, you have to choose the command group. On the left, you’ll find the list of table headers/field of your panel, click on the headers that are a category, like first category, second category and so on.

grouping1

grouping2

grouping3


A very useful capability is to choose the sorting criteria of the grouping. Ascending or Descending for example, but you could follow the order of different field from the one you use for grouping, let’s say you a grouping title field, and grouping order fields. 

A good thing to keep in mind is that the type of field that EasyCatalog sets up is going to change the sorting order. Type can be number or alphanumerical fields. Maybe this is counter-intuitive, take this sample:
A numbered list such as 1, 2, 3, 4, 5, 6, 7, 8, 9, 10, 11, 12. If you set this field as a number this list is sorted in the same way: 1, 2, 3, 4, 5, 6, 7, 8, 9, 10, 11, 12. But if you set the fields as alphanumeric the list will be sorted in this way: 1, 11, 12, 2, 3, 4, 5, 6, 7, 8, 9 funny isn’t it?
Because in alphanumerical values, strings starting with 1 come before strings starting with 2.

Usually, EasyCatalog is good at detecting the right type of fields, but sometimes you have to set it manually. 

Inserting field specifier in the document

Very well, now that you have all your data in an InDesign/EasyCatalog Panel you are ready to do your first magic trick. You can select a value from the data panel. Then select the InDesign Typing tool, create a text frame, chose the insertion point into the text frame and press the small pencil icon at the bottom of the data panel

Tadadddddda
field specifier
You just inserted your first field specifier. You can recognize it from the green square brackets. Having a field inserted in this way lets you keep its content linked to data. That means that it can be updated automatically. Let’s see how.

Let’s say that you used the EasyCatalog pencil tool to insert and few fields from a spreadsheet you used to create an Easycatalog data panel in InDesign. And now you received and updated spreadsheet in which some of the values are changed. And you want to update the content of your InDesign document accordingly.

What you have to do is to place the new excel file in the same location as the old one, with the same file name. After that, in the EasyCatalog Data Panel menu select the command “sync with data source”. You will see some cells in the EasyCatalog Data Panel turning red, (bordered red), it means that now data panel values are not synced with document anymore.
To fix the mismatch give this other command: EasyCatalog Data Panel menu, “update document”.
Tadadddddda
You see the data from the new version of excel appearing in the document, and the cell in the EasyCatalog Data Panel turning back to green

Creating a product style

To automate the creation of a document, we need to create the basic “bricks” that, once put together, will build the document. To create these “bricks” we use Indesign libraries. Every object in the library can have specific pagination rules. We can have an object that paginates only the category title, and one that paginates a picture and a table. Let’s get to work!

For the title, we create a text frame and insert the field specifier from the EasyCatalog panel. The field specifier is characterized by blue square brackets.

productstyle1

We can select the text and change its appearance. So for example, because it is a title, I make it bigger and I use a bold typeface. 

Once we are happy with the appearance we can apply pagination rules. In this case, I want this element to appear once every time the field Category 1 changes. On the pagination rules panel, the attribute for “Paginate” will be “Once per group”, the attribute “group name” will be the name of the field we use to group, in our case “Category1”.

productstyle2

In this panel, there are plenty of attributes that will help you add complexity and enrich your document. For now, we can leave them as they are. The most useful option besides “paginate” is “fitting”. Here you can choose how the text frame should behave according to its content. The options are: do not resize, resize according to the content or let the content flow in different frames (ex. columns or pages).


Images

We can also include images in our library objects. First, we need to identify the field as an image field. To do so right-click on the field title, select “field options”.

imagesetting


Here go to “picture content” and under location write the path of the folder containing your images. Under extension write the type of extension of your image file separated by a semicolon. The most common are .jpg .png .tiff .pdf  Alternatively, you can write in the data file the full name of the image file (example “image.jpg”). Click “OK”. You’ll notice that now there is a plus sign in front of the content of the image field. If you go over with the mouse you’ll see a miniature of the image.

setimages1

Now we can link the InDesign frame to the data. So, let’s create an image frame, when selected we insert the Field specifier, similarly to what we did with the text field. Once the field specifier is inserted correctly you will see the tag under the image frame.

setimages2


Paginating the document

Once all our “bricks” are ready we can paginate the whole data file.

productstyle4

In the data panel triple-click on a cell to select the whole dataset, then got to the options and choose “Paginate…”

paginate


Here you choose the pagination options.


In the first drop-down-menu, we choose “library” since we will paginate using a library, then we need to indicate the path of our library file.

The second set of options will specify pagination rules. In the first drop-down-menu we, choose the paginating method, it can be “into text flow”, “using master pages”, “at position specified in the data”, “using a template document”, we’ll choose “At page guide position”. This method will start paginating from the first guide intersection. I find this method to be very flexible because I can either create a grid or leave the pagination free to flow.

Next, we choose the flow direction, In our case, I think “down, across” is what we need. The next few options can be left unspecified. Here you can choose the asset, if to have a break and the type of break (column, page, odd/even page).

Then there are some settings to activate. Select “Use next position if item doesn’t fit” and “collision detection” under collision detection we can choose the gutter, which is the space left between one paginated object and the other.

When we are happy with the setting we can click “ok” and the pagination will start.
And voilà here is your document paginated!


Updating the document

Now that our document is paginated we can export it and share it. Let’s say that you noticed a typo, or you need to update some product information. You can update the datafile and InDesign document following the steps described at the end of the paragraph “Inserting field specifier in the document”Keep in mind that you can only update the content of elements already in the InDesign file.
If you need, for example, to add or delete a row from a table already paginated, you need to paginate the data again since Easy Catalog can’t edit existing frames, it can only update their contents.

Setting paths correctly

You can download the package folder containing all the necessary files to recreate this document.
You will find:

  • Indesign file (Template.indd)
  • Library file (Library.indl)
  • Data file (Datafile.xlsx)
  • Panel folder (data-panel)
  • Images folder (images)

To successfully use these documents you need to make sure that all paths are set correctly.


Panel Folder
I suggest you place this folder in the default Easy Catalog Workspace. It is a folder that gets automatically created when you install Easy Catalog. Usually, it is located in your Documents folder.
Here you can paste the folder “data-panel” you find in the package you just downloaded.
In a PC the path should be: C:\Users\[USER_NAME]\Documents\EasyCatalog Workspace
In a Mac the path should be: HD:Users:[USER_NAME]:Documents:EasyCatalog Workspace

Once the panel is correctly placed, we need to make sure that it is linked also in InDesign.

  1. Let’s open InDesign.
  2. In a PC go to: Edit > Preferences > EasyCatalog…
    In a Mac go to: InDesign CC > Preferences > EasyCatalog…
    Here you can set the Workspace Folder. Click “Choose” and set the path to the EasyCatalog Workspace
    In a PC it should be: C:\Users\[USER_NAME]\Documents\EasyCatalog Workspace
    In a Mac it should be: HD:Users:[USER_NAME]:Documents:EasyCatalog Workspace
  3. Click ok.

Now you can open the panel in InDesign. Go to:

File > New > EasyCatalog panel… > data-panel

“data-panel” is the name of the panel folder for this project.

ECspacesetting


Project folder

I suggest you keep the rest of the documents you find in the package together. For example, let’s create a folder named “project” in “Documents”.

In a PC it should be: C:\Users\[USER_NAME]\Documents\project
In a Mac it should be:  HD:Users:[USER_NAME]:Documents:project

Here we can keep:
• Indesign file (Template.indd)
• Library file (Library.indl)
• Data file (Datafile.xlsx)
Images folder (images)


Set Images

In order to be able to paginate correctly the images, we need to set the path to this folder. So let’s open the panel and the image column options and make sure that the path is correct (See the image setting part of the “Creating a product style” paragraph).

In our case,
In a PC it should be: C:\Users\[USER_NAME]\Documents\project\images

In a Mac it should be:  HD:Users:[USER_NAME]:Documents:project:images


Synchronize data

The panel you downloaded already has information. It is good practice to correctly synchronize it with the data file in our possession.
To do so we need to:

  1. Open the panel
  2. Click the info icon at the bottom of the panel 
  3. Click “Configure…”
  4. Under location click “Choose”
  5. Select the path and excel document
    In a PC it should be: C:\Users\[USER_NAME]\Documents\project\Datafile.xlsx
    In a Mac it should be:  HD:Users:[USER_NAME]:Documents:project:Datafile.xlsx
  6. Click ok
  7. Click Synchronize to update the panel with the data file information
  8. Click Done


Set Library path

The last thing we need to set is the Library that contains the pagination object we use to paginate our data. We can set it through the pagination popup menu (see also the paragraph “Paginating the document”):

  1. Select all data in the panel
  2. Go to the hamburger menu of the panel
  3. Click “Paginate…”
  4. Click “Choose” to choose the path of the library
    In a PC it should be: C:\Users\[USER_NAME]\Documents\project\Library.indl
    In a Mac it should be: HD:Users:[USER_NAME]:Documents:project:Library.indl
  5. Click “Ok” and the pagination will start

EasyCatalog Services

Pagination provides specialized EasyCatalog consulting services and has a team of experts ready to help in the following areas:

  • Custom project setup
  • Catalog best practices
  • Multilingual documents
  • Custom development
  • Data management consulting
  • Integration services
  • Training
  • Support

How can we help you with EasyCatalog?


easycatalog training Contact us

Create your automated document!

Use one of our free InDesign Templates or upload your own layout. Create documents anytime and from anywhere.